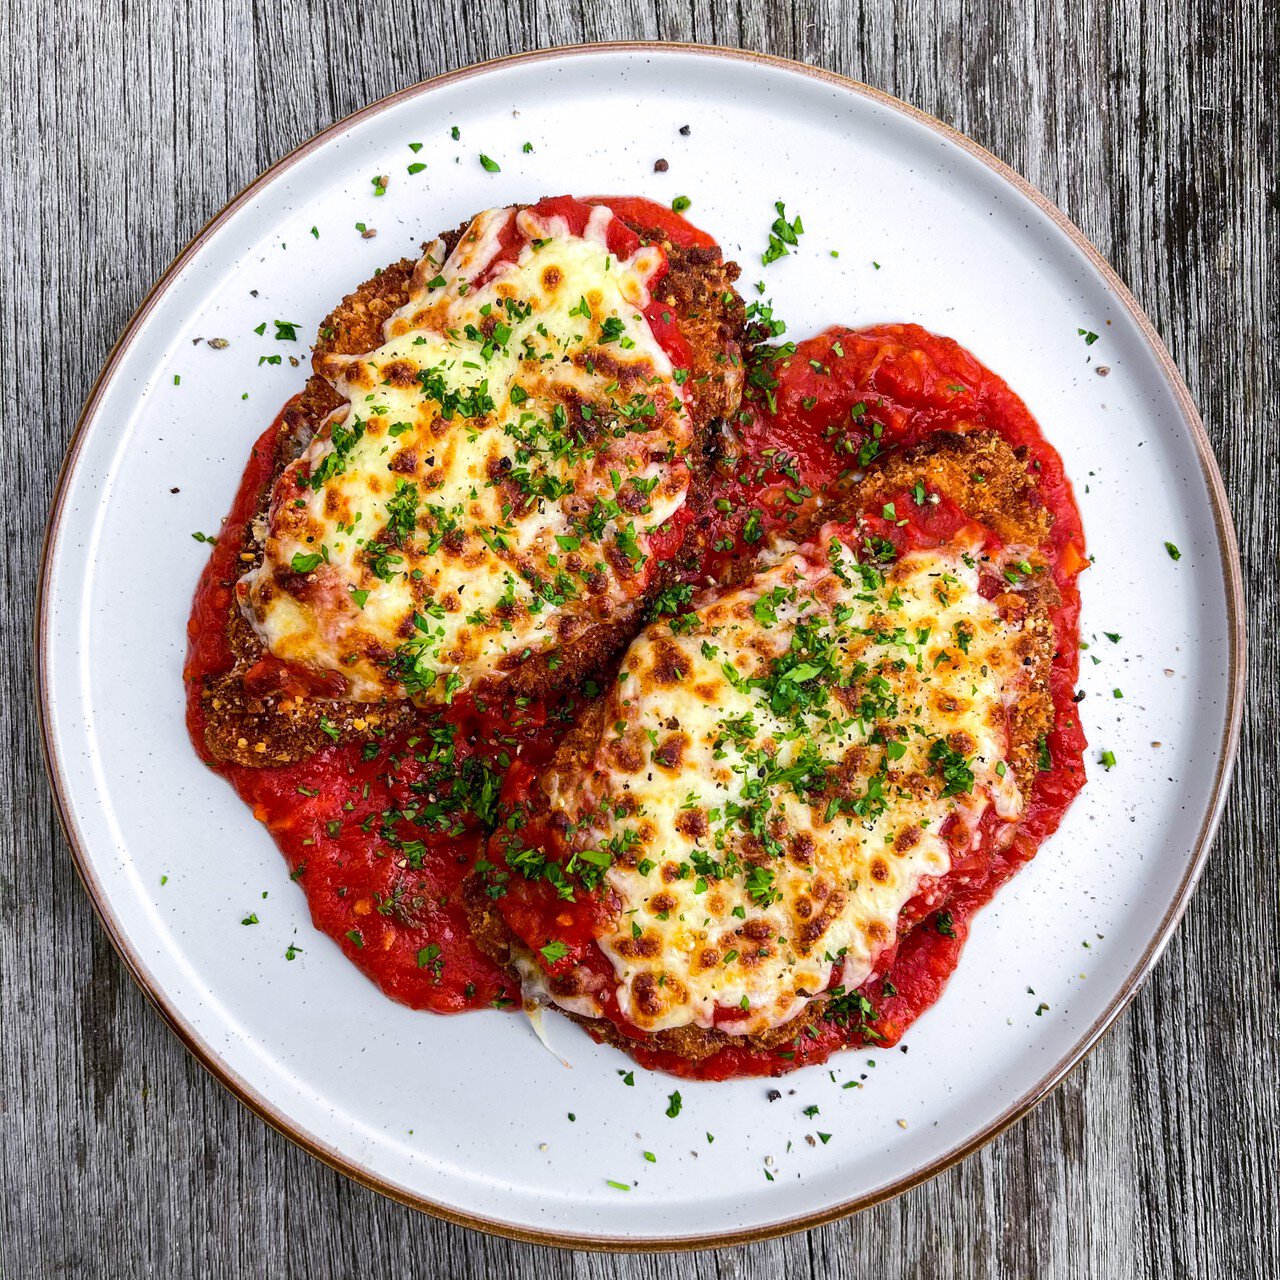
Chicken Parm is one of those timeless dishes that always hits the spot. But let’s be real: many versions fall flat. They can be too soggy, too greasy, or simply lacking that ideal balance of flavours. If you’ve ever had a disappointing chicken parm, you know the struggle. But fear not! This recipe nails the crispy, cheesy, saucy balance that we all crave. With tender chicken breasts, perfectly seasoned breadcrumbs, a homemade tomato sauce, and an extra cheesy finish, this dish brings everything to the table and more.
The process may seem a bit involved, but the result is undeniably worth it. Whether you’re making it for a family dinner or impressing guests, this chicken parm will be a hit every single time.
Table of Contents
- Ingredient Breakdown
- How to Get the Perfect Crunch
- Homemade Tomato Sauce
- Cheese Layers: Parmigiano and Mozzarella
- Serving Your Chicken Parm
- More Chicken Recipes
Ingredient Breakdown
- Chicken breasts: Halved horizontally and pounded for even thickness, this is the star of the show.
- Sweet onion: Adds a subtle sweetness to the homemade sauce.
- Garlic: A must-have for the sauce, lending depth and aroma.
- Crushed red chilli flakes: Optional, but a touch of heat balances the sweetness of the sauce.
- Passata: The base of the rich tomato sauce.
- Water: Used to thin the passata slightly for the perfect consistency.
- Sugar: Helps cut through the acidity of the tomatoes, rounding out the sauce’s flavour.
- Fresh basil: For an aromatic, herby note in the sauce.
- Plain flour: The first layer of the breading that helps the egg and panko stick.
- Garlic granules: For extra flavour in the seasoned flour.
- Italian herbs: Adds that traditional Italian flavour to the breading.
- Panko breadcrumbs: The secret to a super crispy coating.
- Parmigiano Reggiano: A key ingredient in the breadcrumb coating, adding saltiness and richness.
- Eggs: For binding the breadcrumbs to the chicken.
- Mozzarella: Provides the gooey, melty texture on top of the chicken.
- Vegetable oil: Essential for frying to achieve that golden crisp.
How to Get the Perfect Crunch
Achieving that perfect crispy crust on your chicken is one of the most crucial parts of making Chicken Parm shine. The key to a crunchy, golden exterior lies in the breading technique. Start by preparing your dredging station. This involves seasoning the flour with garlic granules, Italian herbs, and black pepper for flavour. Then, dip the chicken into the flour, followed by an egg wash, and finally the panko-Parmigiano mix. For an extra crunchy coating, double-coat the chicken. After dipping in the egg, repeat the panko step to create a thicker, crunchier layer.
The technique doesn’t stop there. Chill the breaded chicken for at least 30 minutes. This allows the breadcrumbs to adhere better and prevents them from falling off during frying. When it’s time to fry, ensure the oil is hot enough. A good test is to dip a piece of chicken into the oil. It should sizzle immediately. Fry in batches to avoid overcrowding, which can lead to soggy results.
Homemade Tomato Sauce
While the breaded chicken is undoubtedly the star, the homemade tomato sauce takes this Chicken Parm from good to great. The sauce is simple, but it’s all about layering flavours. Start by sautéing finely chopped onion in a little extra-virgin olive oil until softened. Add minced garlic (and optional red chilli flakes for a touch of heat), and cook for just a minute. Then, stir in passata, a bit of water, sugar, and fresh basil.
The magic happens when the sauce simmers. The tomatoes cook down, becoming rich and slightly sweet while the garlic and basil infuse their aromas. The sauce should simmer for 45 to 50 minutes, reducing to a thick, rich consistency. The sugar balances out the acidity of the tomatoes, while the basil adds a fresh, herbal depth. After seasoning to taste, the sauce is ready to generously spoon over the crispy chicken cutlets.
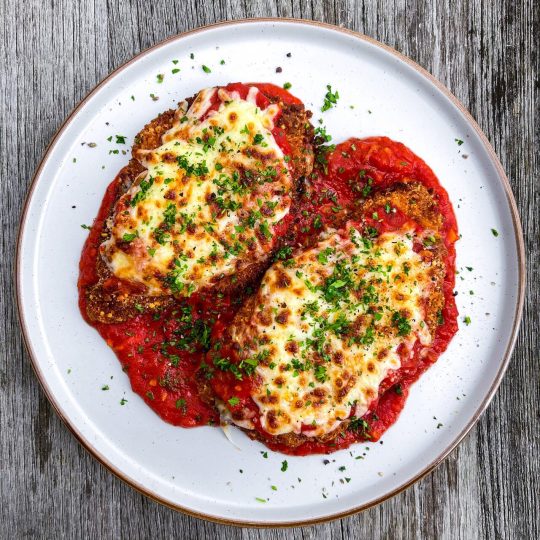
Cheese Layers: Parmigiano and Mozzarella
The cheese situation is where Chicken Parm really comes alive. You need both Parmigiano Reggiano and mozzarella to create the perfect balance. Parmigiano brings a salty, nutty flavour that contrasts beautifully with the creaminess of mozzarella. By combining the two, you get a depth of flavour as well as the perfect texture. Mozzarella becomes melty and gooey, while Parmigiano adds a slight crunch to the top layer as it grills.
Generously top each breaded chicken cutlet with a spoonful of the homemade sauce, then a sprinkle of mozzarella and Parmigiano. When it’s under the grill, the cheese melts into bubbly perfection, with golden spots of crispy cheese. This melty layer, combined with the crispy chicken, creates an irresistible combination that’s hard to beat.
Serving Your Chicken Parm
Once your Chicken Parm is ready, there’s just one last thing to do: serve it up! Whether you’re enjoying it with a side of pasta, a fresh salad, or simply some crusty bread, this dish pairs well with almost anything. The crispy chicken cutlets are rich and satisfying, while the homemade sauce brings freshness and depth.
If you want to take things up a notch, drizzle a little extra virgin olive oil over the top just before serving. A sprinkle of fresh basil adds an additional pop of colour and freshness, tying all the flavours together. Serve immediately for that wonderful contrast between the hot, melty cheese and the crispy chicken.
More Chicken Recipes
If you’ve enjoyed making these Chicken Parm, here are some more of my recipes I think you’ll like:
- Chimichurri Chicken: Chicken so good it’ll make you dance! The chicken is marinated in a tasty combination of herbs and spices then seared until perfectly cooked and juicy.
- Kimchi Chicken Katsu: This kimchi chicken katsu recipe puts a Korean spin on a Japanese classic. The chicken gets marinated in kimchi juice, before being breaded and fried to golden perfection.
- Chicken Biryani: This recipe is an homage to the iconic Hyderabadi Biryani, a perfect blend of Mughlai and Telugu culinary traditions.
- Grilled Garlic & Lemon Chicken Thighs: The combination of garlic, lemon, and fresh herbs creates a marinade that deeply infuses the meat, ensuring every bite is succulent and aromatic. Whether cooked over an open flame or roasted in the oven, these chicken thighs turn out juicy, golden, and packed with zest.
If you’d like to see how I make all these recipes and more, head on over to my Instagram!
Chicken Parm
I made a lot of mediocre and straight up bad chicken parm over the course of developing this recipe. It was either too soggy, too heavy, not seasoned enough or not well-balanced. I’m so happy to say that I’ve finally nailed it – if I do say so myself! The recipe uses chicken breasts, halved horizontally and pounded to an even thickness. They’re coated in a well-seasoned flour dredge, then egg, then breaded in a combination of panko and parmigiano reggiano. Each cutlet is then topped with a simple yet rich homemade tomato sauce and finished with yet more parmigiano reggiano and mozzarella – the former brings saltiness and nuttiness and the latter melty, ooey-gooey goodness.
- Prep Time: 20 minutes
- Total Time: 1 hour
- Yield: 6 1x
- Category: Chicken
Ingredients
For the sauce:
- extra-virgin olive oil
- 1 sweet onion, very finely chopped
- 2 garlic cloves, minced
- ½ tsp crushed red chilli flakes, optional
- 700 ml passata
- 100 ml water
- 2 tsps sugar
- 2 sprigs fresh basil, whole
For the chicken:
- 3 chicken breasts (or double the amount of boneless, skinless chicken thighs)
For the seasoned flour:
- 65 g plain flour
- 2 tsps fine sea salt
- 2 tsps garlic granules
- 2 tsps dried Italian herbs
- 1 tsp freshly-ground black pepper
For the egg dredge:
- 2 large eggs
- ¼ tsp freshly-ground black pepper
For the crispy coating:
- 100 g panko (Japanese breadcrumbs)
- 50 g grated parmigiano reggiano
The rest:
- 150 g grated mozzarella
- 50 g grated parmigiano reggiano
- 500 ml vegetable oil, for frying
Instructions
Preparing the sauce:
- Heat a splash of extra-virgin olive oil in a medium saucepan over medium heat. Add the onion and season with a good pinch of sea salt and freshly-ground black pepper. Cook, stirring occasionally, until softened, 5 to 7 minutes.
- Add the garlic (and chilli flakes, if using) and cook, stirring constantly, for 1 minute, then add the passata, water, sugar and basil. Season with sea salt and freshly-ground black pepper, stir to combine and bring to a simmer.
- Partially cover the saucepan with a lid (to avoid splattering), reduce the heat to low and simmer, stirring occasionally, for 45 to 50 minutes, or until thickened. Taste and adjust seasoning and fish the basil stems out. Set aside.
Preparing the chicken:
- Slice each chicken breast in half horizontally then lightly pound to an even thickness of around ½ inch. If using chicken thigh fillets, do not halve them; simply pound them to the same thickness.
- Prepare the dredging station: 1) Combine the flour, salt, garlic granules, Italian herbs and black pepper. You want to ensure that everything is well-incorporated. Transfer the seasoned flour to a wide, shallow bowl. 2) Whisk the eggs and black pepper in a separate wide, shallow bowl. 3) Combine the panko and parmigiano reggiano until well-incorporated then transfer to a large plate. 4) Combine the grated mozzarella and parmigiano reggiano in a bowl.
- Bread the chicken: 1) Dredge 1 piece of chicken in the seasoned flour, turning to coat. Shake off any excess. 2) Dip it in the egg, turning to coat. Let the excess drip back into the bowl. 3) Finally, dredge the chicken in the panko-parm mixture, pressing firmly to help it adhere and ensuring that there aren’t any bare spots. Gently shake off any excess then transfer the chicken to a large plate or baking sheet. Repeat with the remaining chicken.
- Place a wire rack in a large baking tray. This will help the bottom of the chicken stay crispy. Heat the vegetable oil in a large frying pan over medium/medium-high heat. You can check if the oil is hot enough by dipping in the of the chicken – it should sizzle immediately.
- Working in 2 or 3 batches, cook the chicken, turning once, until deeply golden and crispy on both sides, around 2 minutes per side. Transfer the chicken to the wire rack.
- Heat your oven grill on high. Generously spoon some of the sauce over each of the chicken piece, covering only about 80% of the surface to leave some crispy bits. Top with the cheese mix, again leaving some exposed parts.
- Grill until the cheese is melted, bubbling and beginning to develop brown spots. Serve immediately, with the extra sauce, which you can reheat on low while the chicken is under the grill. Enjoy!
Equipment
 Buy Now →
Notes
The equipment section above contains affiliate links to products we use and love!