
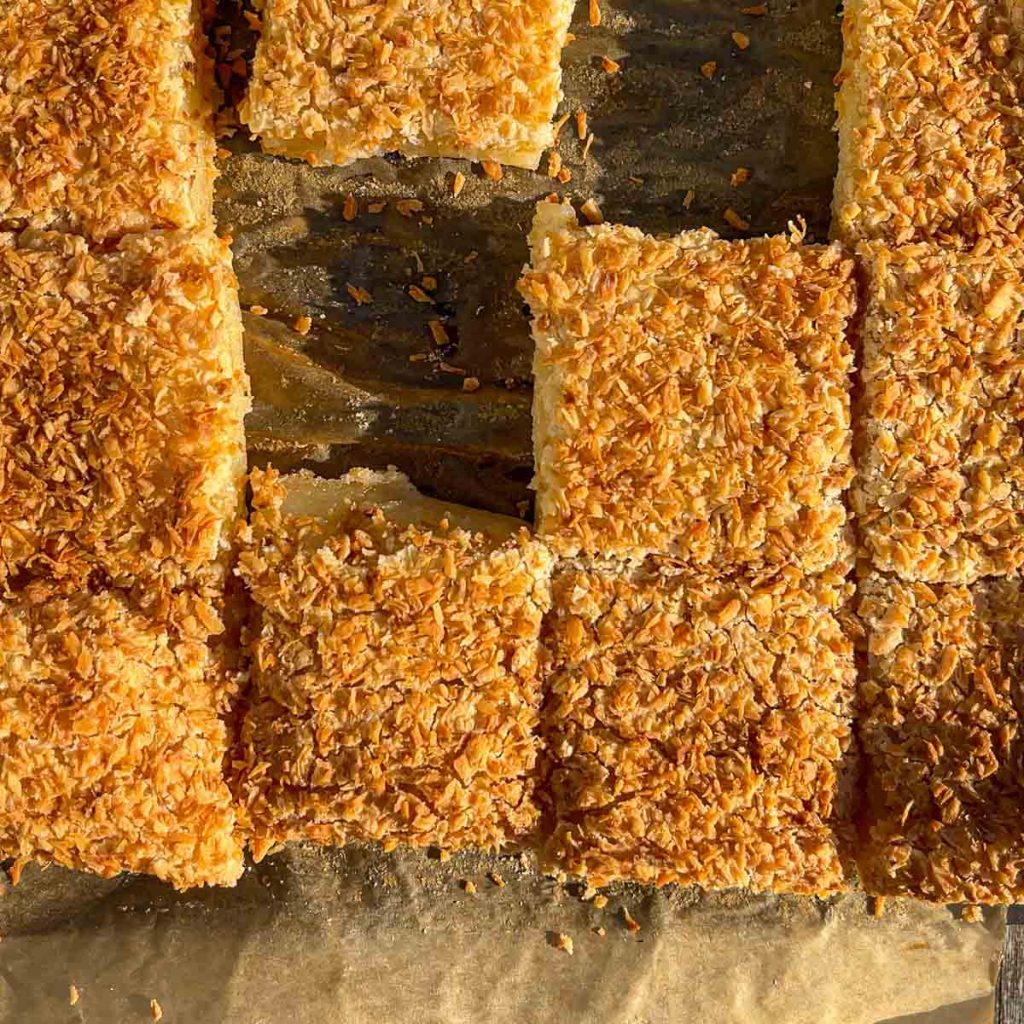
If you love the satisfying chew of mochi, you’re in for a treat with this Coconut Mochi Cake. With its crisp golden crust and soft, squidgy centre, this cake delivers on texture and flavour. The best part? It’s naturally gluten-free, thanks to glutinous rice flour, and the batter comes together in a single bowl in less than five minutes. Whether you’re a confident baker or someone who rarely turns on the oven, this recipe is approachable, foolproof, and endlessly rewarding.
Watch me make it here.
Table of Contents
- Ingredient Breakdown
- What Makes This Coconut Mochi Cake So Irresistible?
- This Coconut Mochi Cake is a One-Bowl Wonder
- Why Coconut Milk Quality Matters
- Tips for Baking Success
- Serving and Storing your Coconut Mochi Cake
- Why This Coconut Mochi Cake Deserves a Spot in Your Repertoire
- More Dessert Recipes
Ingredient Breakdown
- Glutinous rice flour: The star ingredient, lending the coconut mocha cake its characteristic chewy texture. Not to be confused with regular rice flour, this is what gives the cake its mochi-like qualities.
- Sugar: Adds sweetness to balance the nuttiness of the coconut and the richness of the coconut milk.
- Baking powder: Helps the cake puff up slightly as it bakes, giving the edges a firm, crisp texture.
- Salt: Enhances the flavour of the coconut and balances the sweetness.
- Eggs: Bind the ingredients together and provide structure to the cake.
- Coconut milk: Adds creaminess and a rich coconut flavour. Use a full-fat version with at least 70% coconut extract for the best results.
- Coconut oil: Keeps the cake moist and adds a subtle, complementary coconut aroma.
- Desiccated coconut: Sprinkled on top for a toasty, crunchy finish that contrasts beautifully with the soft interior.
What Makes This Coconut Mochi Cake So Irresistible?
Mochi cakes stand out for their unique texture, which comes from glutinous rice flour. Despite its name, this flour contains no gluten—it’s made from sticky rice, also called sweet rice. When baked, the starches in the flour gelatinise, creating a dense but delightfully elastic crumb. This is what gives mochi cakes their signature chewiness, a texture that’s both comforting and addictive.
This Coconut Mochi Cake takes this a step further by layering in rich, nutty coconut flavours from coconut milk, oil, and desiccated coconut. The result is a cake that’s not just chewy but also fragrant, creamy, and deeply satisfying.
This Coconut Mochi Cake is a One-Bowl Wonder
This Coconut Mochi Cake recipe is perfect for those who shy away from baking. There’s no creaming, no folding, and no risk of overmixing. Glutinous rice flour is naturally gluten-free, which makes it very forgiving. There’s no risk of gluten development (which would make the cake dense) so you can whisk the batter to your heart’s content without worrying about tough or dense results. Everything but the desiccated coconut goes into one bowl, and in less than five minutes, your batter is ready to pour into the tin.
The simplicity of the method also makes this cake ideal for experimenting with add-ins. Fancy a pop of colour? Stir in some finely diced mango or pandan essence. Looking for crunch? Toasted sesame seeds or chopped macadamias would be a welcome addition.
Why Coconut Milk Quality Matters
The choice of coconut milk can make or break this Coconut Mochi Cake. To achieve that rich, creamy coconut flavour, opt for full-fat coconut milk with at least 70% coconut extract. Avoid coconut milk labelled as “light” or “reduced fat,” as these versions can dilute the flavour and compromise the cake’s texture.
For those who prefer a more intense coconut flavour, you can even substitute part of the coconut milk with coconut cream. This won’t change the cake’s structure, but it will amplify its coconutty character.
Tips for Baking Success
- Prep the tin properly: Coconut oil prevents sticking while adding a hint of flavour. Grease your tin generously, and don’t skip lining it with greaseproof paper. This ensures the cake releases cleanly, even with its slightly sticky texture.
- Keep an eye on the bake: The cake is ready when the edges are golden brown and firm. The centre should be puffed but may still have a slight jiggle—it will set as it cools. Overbaking can dry out the edges, so start checking at the 40-minute mark.
- Cool completely before slicing: Mochi cakes are easiest to cut once cooled. Use a sharp knife for clean edges, wiping the blade between cuts to avoid sticking.
Serving and Storing your Coconut Mochi Cake
This Coconut Mochi Cake is at its best when served at room temperature. The crisp top layer of desiccated coconut contrasts beautifully with the tender, chewy crumb beneath. This cake doesn’t need embellishment, but if you’re feeling indulgent, serve it with a dollop of whipped cream or a drizzle of condensed milk.
The cake keeps well for three to four days at room temperature, tightly wrapped in cling film. Its texture actually improves slightly as it rests, becoming even chewier by the second day. If you want to prolong its life, store it in an airtight container in the fridge and bring it back to room temperature before serving.
Why This Coconut Mochi Cake Deserves a Spot in Your Repertoire
This Coconut Mochi Cake is more than just a dessert—it’s a conversation starter. Its unique texture and tropical flavour make it a standout treat for sharing. Whether you’re introducing friends to the joys of mochi or satisfying your own craving for something chewy, this cake delivers.
It’s also incredibly versatile. Serve it as part of a dessert spread, bring it to a potluck, or enjoy it with a cup of tea on a quiet afternoon. With minimal effort and just a handful of pantry staples, you can whip up a cake that’s as comforting as it is impressive.
So if you’ve never tried baking with glutinous rice flour, this is your sign. Coconut Mochi Cake is the perfect entry point—easy to make, delicious to eat, and impossible to forget.
More Dessert Recipes
If you love this Coconut Mochi Cake and would like to try some of my other dessert recipes, why not start here?
- Strawberry Galette With Elderflower: This stunning strawberry galette is an easy dessert that combines the natural sweetness of strawberries with the floral notes of elderflower. The result is a dessert that’s as beautiful as it is delicious.
- Maple Cinnamon Baked Peaches: A summer staple! Sweet, juicy peaches are halved and drizzled with a maple-cinnamon glaze, before being baked to golden perfection. As they bake, the peaches soften, their natural sugars intensify, and the syrupy glaze caramelises, creating a warm, comforting dessert
- Classic Tiramisu: You can’t go wrong with a classic and this tiramisu is made in the traditional way.
- Strawberry Tiramisu: In this fresh and fruity take on the Italian classic, coffee and chocolate are swapped for fresh strawberries, layered with a delicious homemade vanilla cream and strawberry-infused sponge fingers.
Coconut Mochi Cake

I love chewy foods. There’s just something so satisfying about them. If you’re a fan of mochi, you’ll love this coconut mochi cake. It’s crispy on the outside and soft and squidgy in the middle. It gets its chew from glutinous rice flour, which also makes it naturally gluten-free. I’m not a huge baker, but this recipe is so easy to make and the batter comes together in one bowl in less than 5 mins. I hope you’ll give it a go!
- Prep Time: 5 minutes
- Total Time: 1 hour
- Yield: 16 1x
Ingredients
- 300g glutinous rice flour
- 150g sugar
- 1 tsp baking powder
- 1 tsp salt
- 2 large eggs
- 1 x 400ml can coconut milk (minimum 70% coconut extract)
- 75ml coconut oil, melted, plus more for greasing
- 50g desiccated coconut
Instructions
- Heat your oven to 180°C / fan 160°C.
- Place everything but the desiccated coconut in a large mixing bowl and whisk until smooth. Glutinous rice flour is naturally gluten-free so there’s no risk of over-mixing here.
- Brush a 23cm square tin with coconut oil and line with greaseproof paper. Pour the batter into the tin and top with the desiccated coconut, sprinkled in an even layer.
- Bake for 45 minutes, or until golden brown and puffed with firm edges. Transfer the tin to a wire rack and let cool 10 minutes, then lift the cake out of the tin and transfer it to a chopping board to cool completely. The cake will deflate slightly as it cools.
- Once cooled, slice the cake into squares and serve. It will keep for 3 to 4 days at room temperature, tightly wrapped in cling film.
Notes
- It’s important that you use the right size baking tin for the cake to cook properly.
- The recipe as written makes 16 squares.


2 responses
The recipe is so easy to follow and the result is so tasty and delicious! What a treat!!
I’m so glad you enjoyed it! Thank you for the positive feedback 🙂