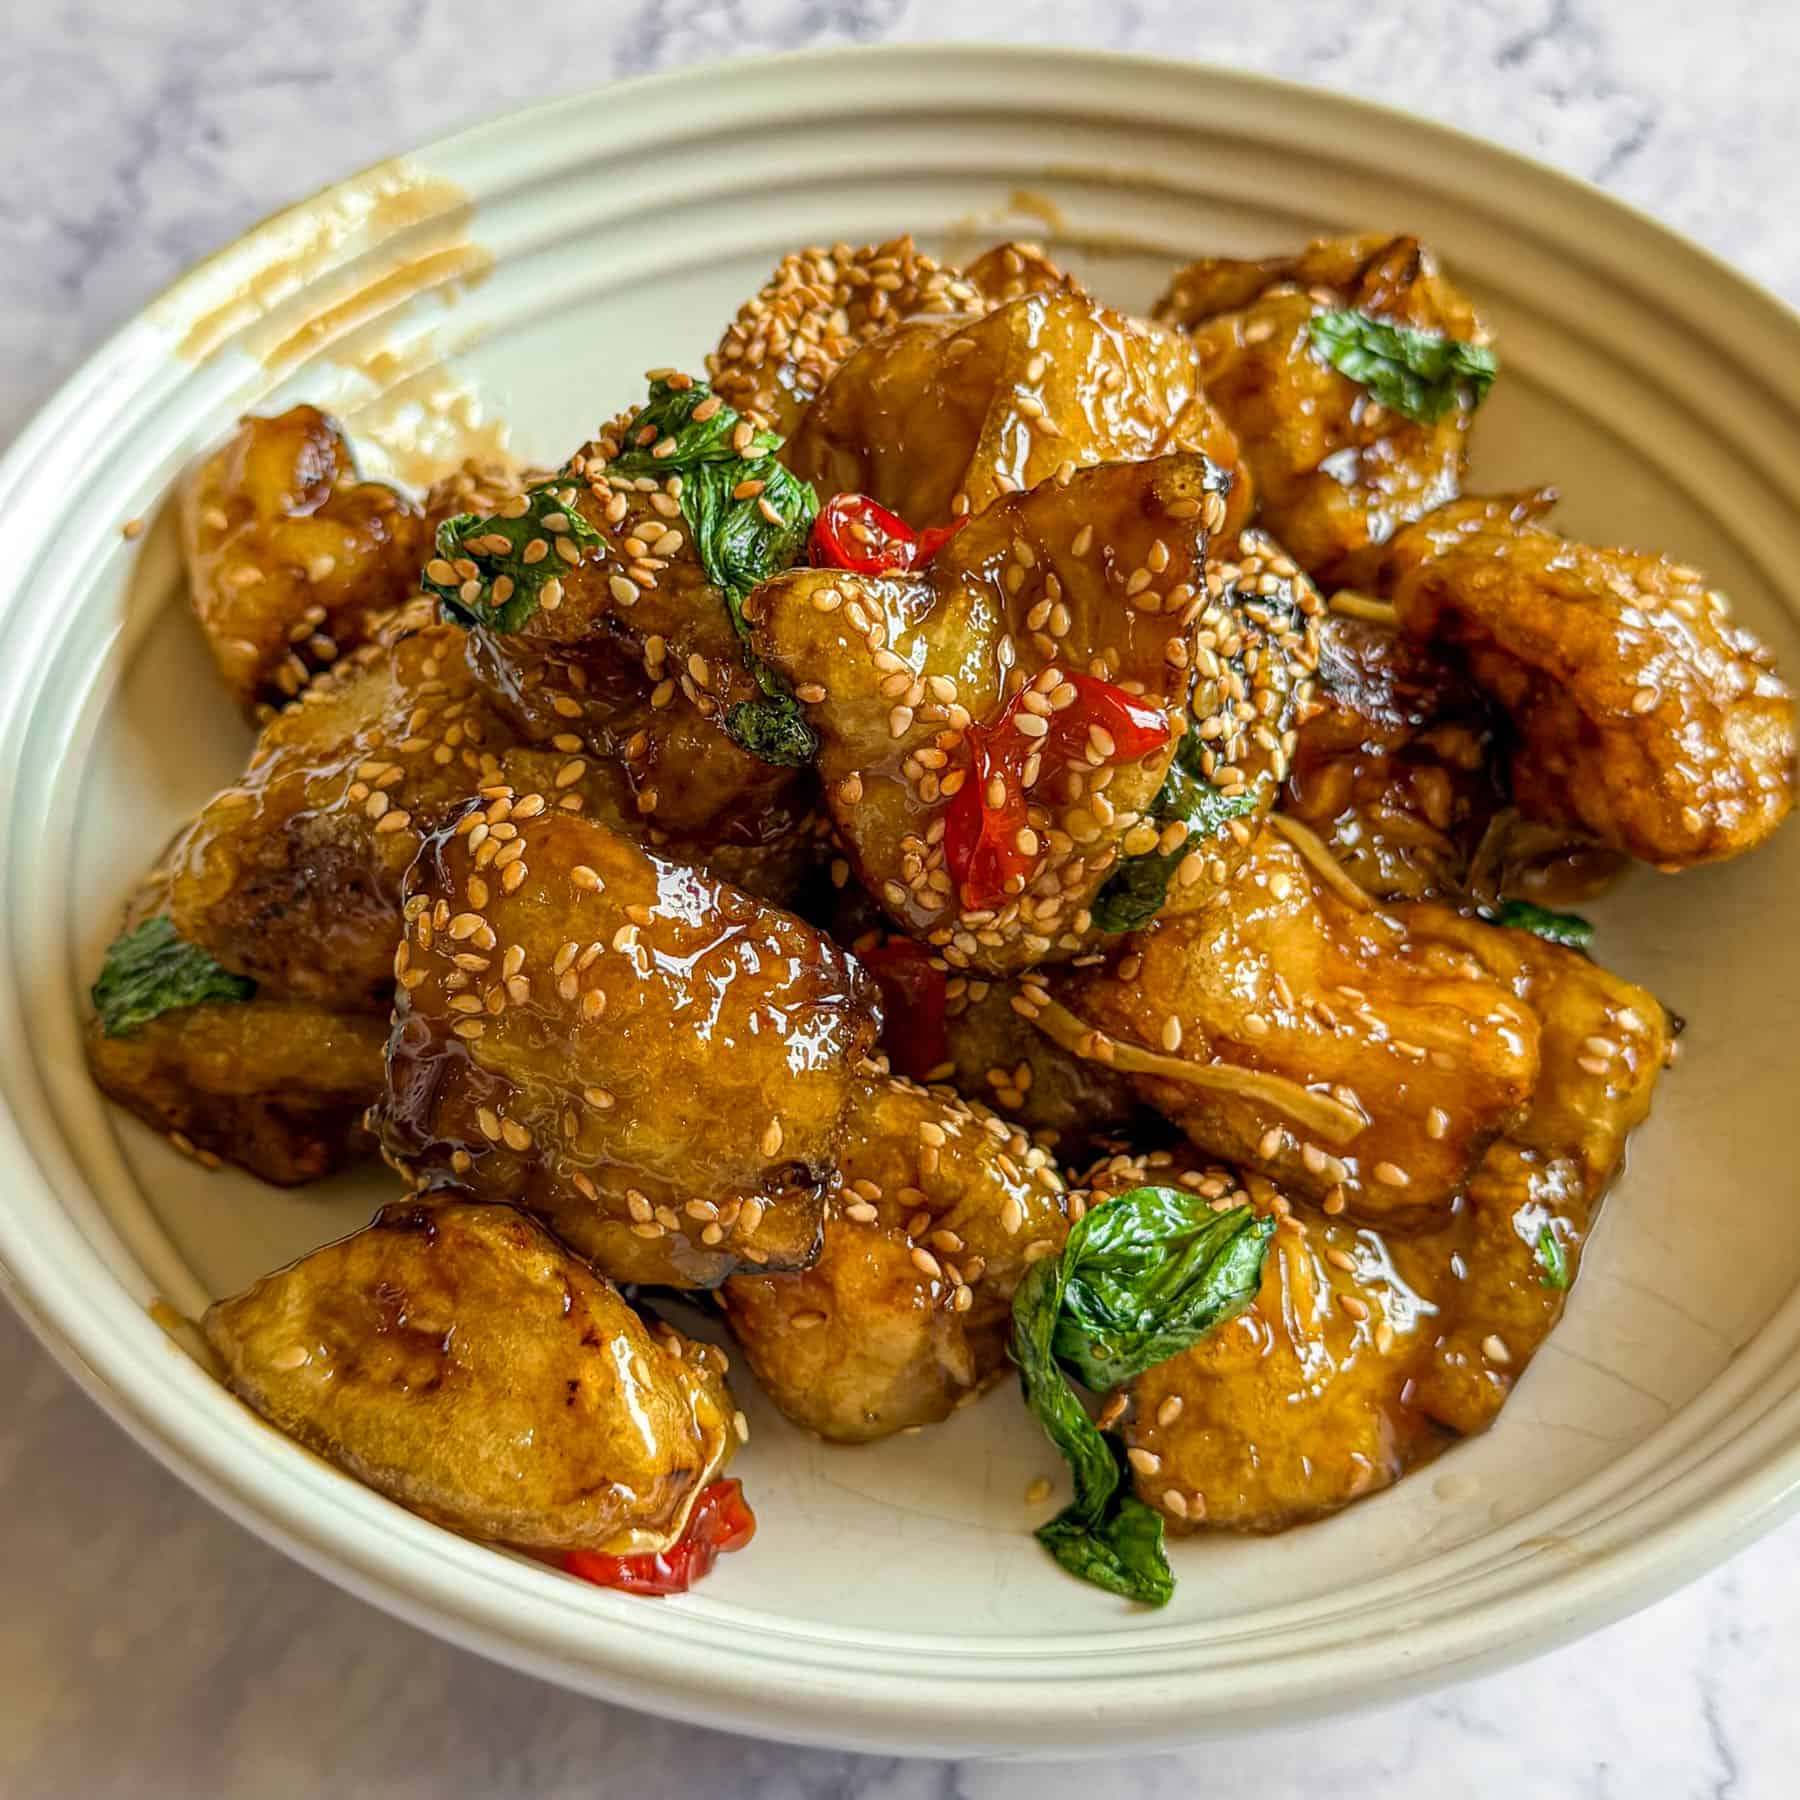
This Lemongrass Fried Chicken is everything fried chicken should be: juicy, deeply aromatic and irresistibly crispy. The brine builds flavour from the inside out, the coating delivers that signature craggy crunch, and a drizzle of lemongrass hot honey takes it to the next level. The crust stays crispy long after frying, the meat stays juicy and tender, and every bite carries the bright, citrusy notes of lemongrass.
When it comes to fried chicken, there’s a fine line between greasy and glorious. The difference lies in the details – the flour you use, how you dredge, and the temperature you fry at. Each step in this Lemongrass Fried Chicken recipe has been designed to create the crispiest, lightest crust possible. Let’s get into how to achieve it.
If you love recipes with a similar bright, aromatic edge, try my Spicy Lemongrass Chicken Stir Fry or Fennel Cod Schnitzel with Fennel & Apple Slaw next.

Ingredient Breakdown
- Chicken thighs and drumsticks – juicy, flavourful cuts that stay moist even after long frying times
- Lemongrass – bright and citrusy, the backbone of both the brine and hot honey
- Makrut lime leaves – fragrant and floral, amplifying the lemongrass aroma
- Garlic – adds depth and balance to the sharp citrus notes
- Salt – seasons the brine and draws flavour deep into the meat
- 00 flour – finely milled and low in absorbency for an ultra-light, crisp crust
- Vegetable oil – neutral and stable at high heat, perfect for deep frying
- Honey – the base for the lemongrass hot honey drizzle
- Chilli flakes – add heat and balance the sweetness of the honey
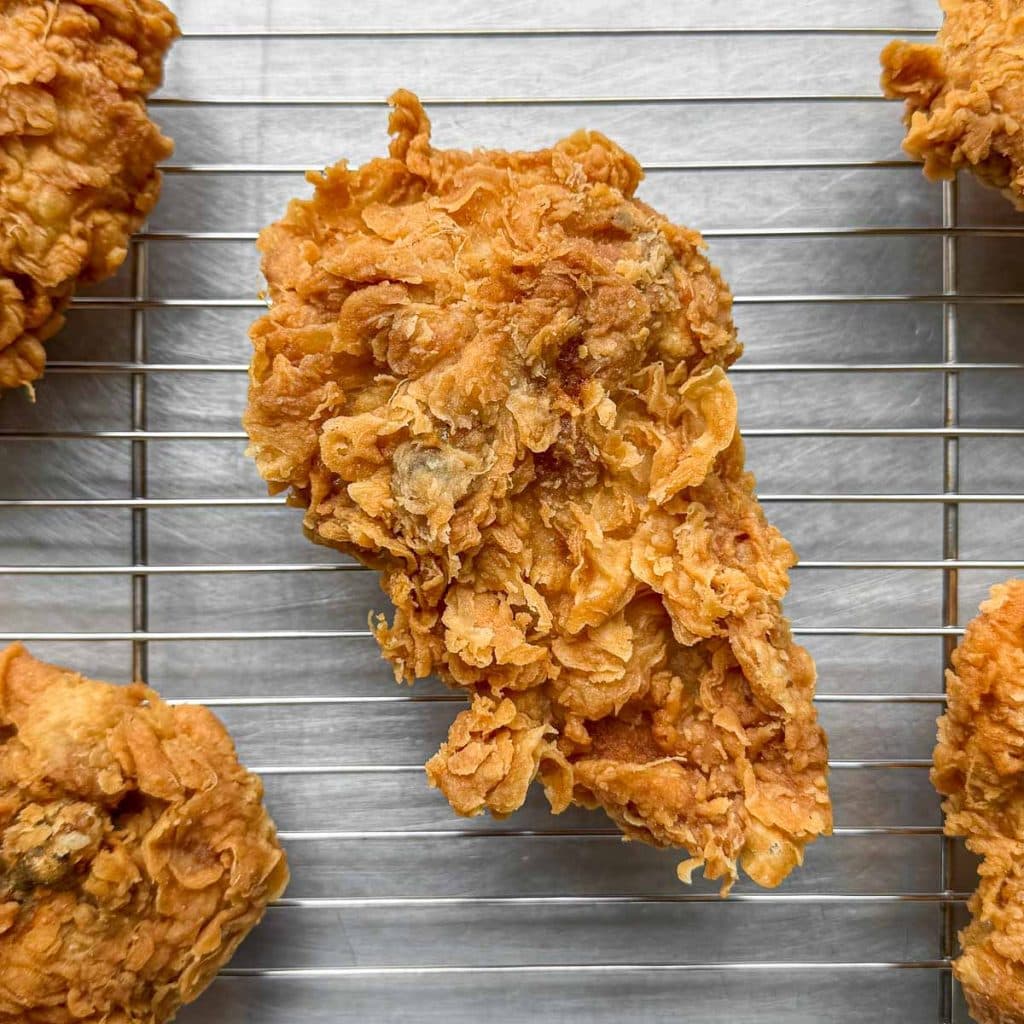
Secret 1 to Crispiest Lemongrass Fried Chicken: 00 Flour
The first secret behind truly crispy Lemongrass Fried Chicken lies in the flour. 00 flour, most often used for pasta and pizza dough, has an exceptionally fine grind that transforms the crust. Where plain flour can produce a dense coating, 00 flour forms a lighter, thinner shell that shatters delicately with each bite.
Its low absorbency keeps the crust dry and clean, preventing oiliness and preserving that fragile crunch. The fine texture also creates more surface area for crisping, which helps the coating cling evenly to the chicken. Think of it as the difference between a heavy batter and a whisper-thin tempura – this is the secret to that ethereal crunch.
I picked up the 00 flour tip from Sohla El-Waylly, whose fried chicken method achieves the same feather-light coating. It’s such a small swap, yet it makes a remarkable difference. If 00 flour isn’t available, plain flour still works, but the result won’t have quite the same refined crispness or lasting crunch.
Secret 2 to Crispiest Lemongrass Fried Chicken: Adding Brine to the Flour
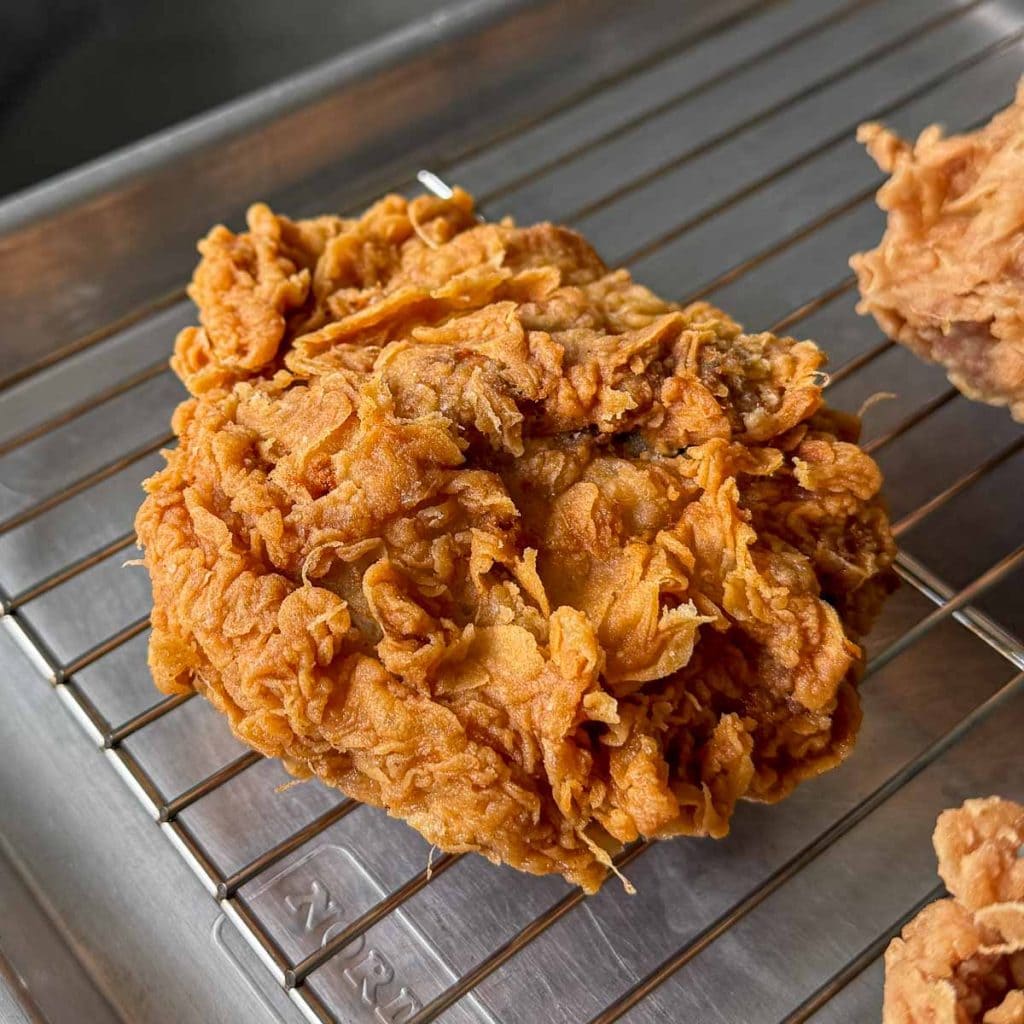
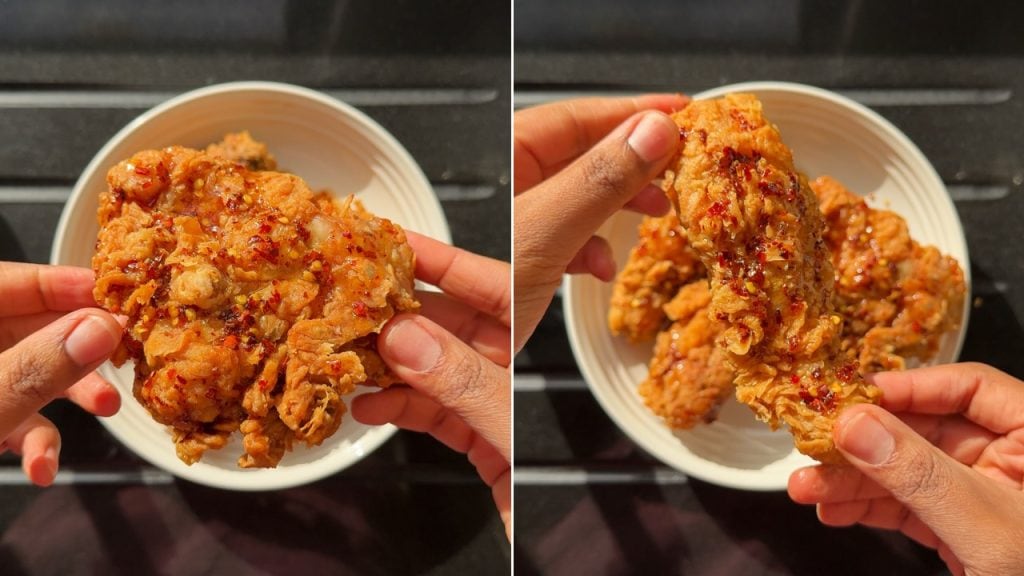
The second secret of truly crispy fried chicken lies in creating texture in the coating. After brining the chicken, a few spoonfuls of that aromatic liquid go straight into the flour. Tossed gently by hand, it forms tiny clusters – irregular bits of hydrated flour that cling to the chicken and fry into crisp, craggy shards.
These little clusters are what make this Lemongrass Fried Chicken so crispy. They blister and expand in the oil, creating deep, layered crunch that stays crisp even after resting. It’s a subtle but transformative step, turning a smooth coating into a textured, golden crust that’s full of contrast.
Brining itself is non-negotiable. The blend of lemongrass, garlic and lime leaves infuses the chicken deeply while keeping it juicy. Too short, and the flavour won’t penetrate; too long, and the texture becomes soft. An overnight brine strikes the perfect balance – flavourful, tender, never mushy.
Secret 3 to Crispiest Lemongrass Fried Chicken: The Claw Method
This is the most hands-on secret to making incredibly crispy fried chicken, and arguably the most satisfying. The claw method involves pressing the flour firmly into the chicken with your fingers shaped like a claw. You’re not just coating; you’re compacting the flour, building the texture that defines perfect fried chicken.
As you press, the flour grips unevenly, forming those signature rough edges that puff and crisp once fried. Each piece should look almost shaggy, like it’s covered in torn fabric. That’s the texture you want before the chicken even touches the oil.
Take your time with this step. A rushed dredge leaves flat patches that won’t crisp evenly. Slowing down for just a few extra seconds per piece ensures every bite of your Lemongrass Fried Chicken delivers that golden, shattering crunch you’re after.
Secret 4 to Crispiest Lemongrass Fried Chicken: Low Temperature Frying
The final secret to the crispiest fried chicken is patience. Frying at around 160°C allows the chicken to cook gently, giving the crust time to fully dehydrate and crisp while keeping the inside tender and juicy. High heat browns the exterior too fast and risks leaving the centre undercooked; too low, and the coating absorbs oil.
A food thermometer is worth using here – it removes all guesswork and keeps the results consistent. This is the one I use. Maintaining a steady oil temperature is what turns good fried chicken into exceptional fried chicken.
The choice of oil matters too. Always use one with a high smoke point and neutral flavour – sunflower, vegetable or peanut are ideal. They stay stable across multiple batches without developing bitterness or burnt flavours. Lower smoke point oils like canola or virgin coconut can break down faster and alter the taste.
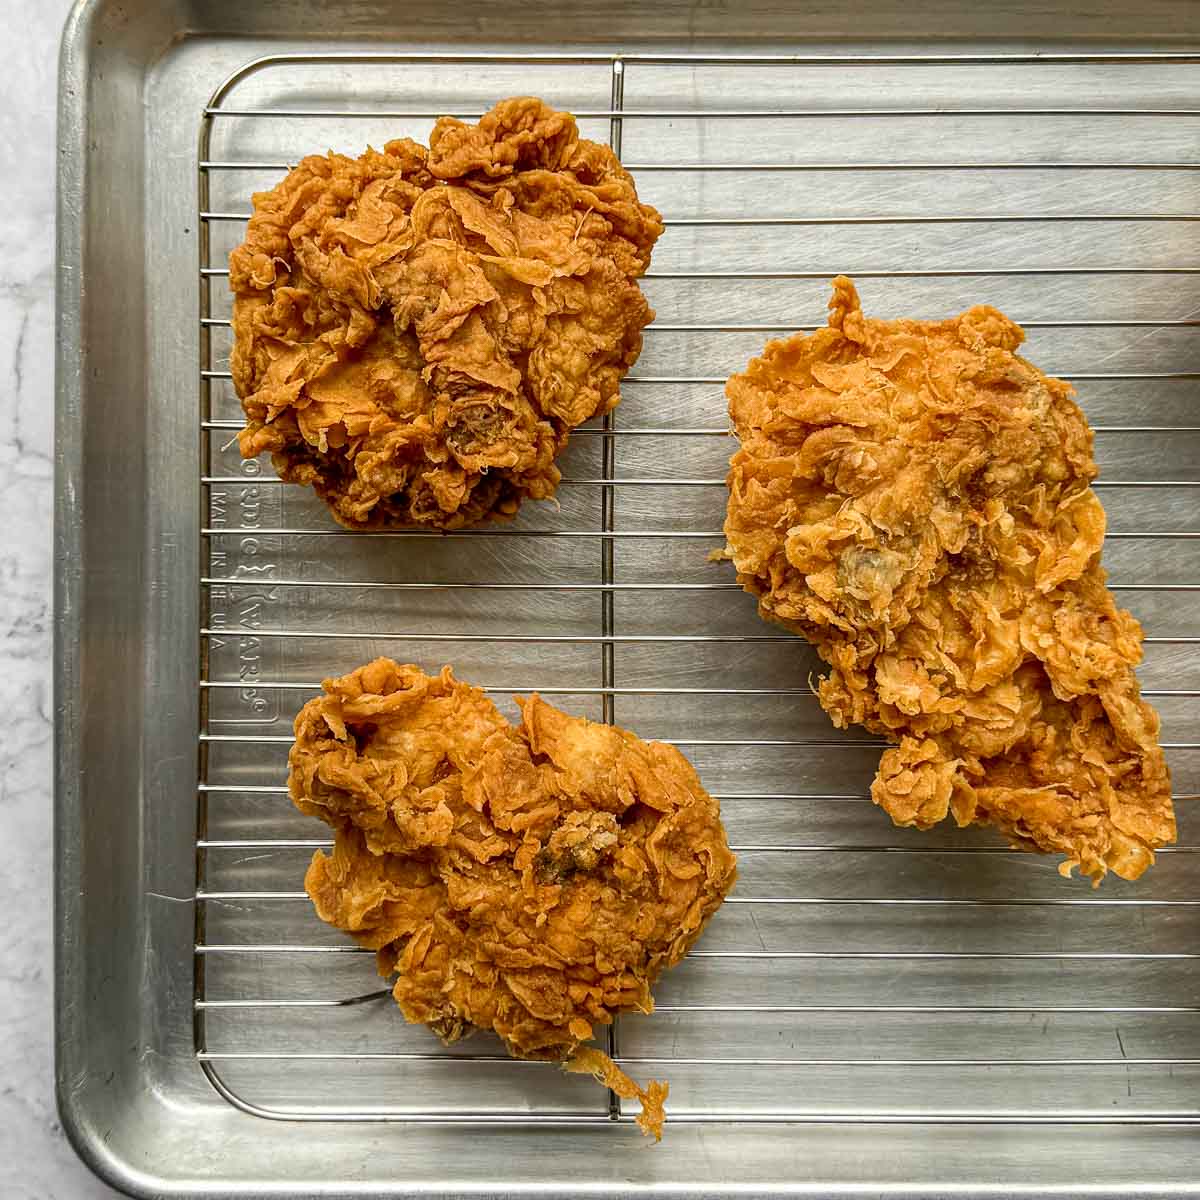
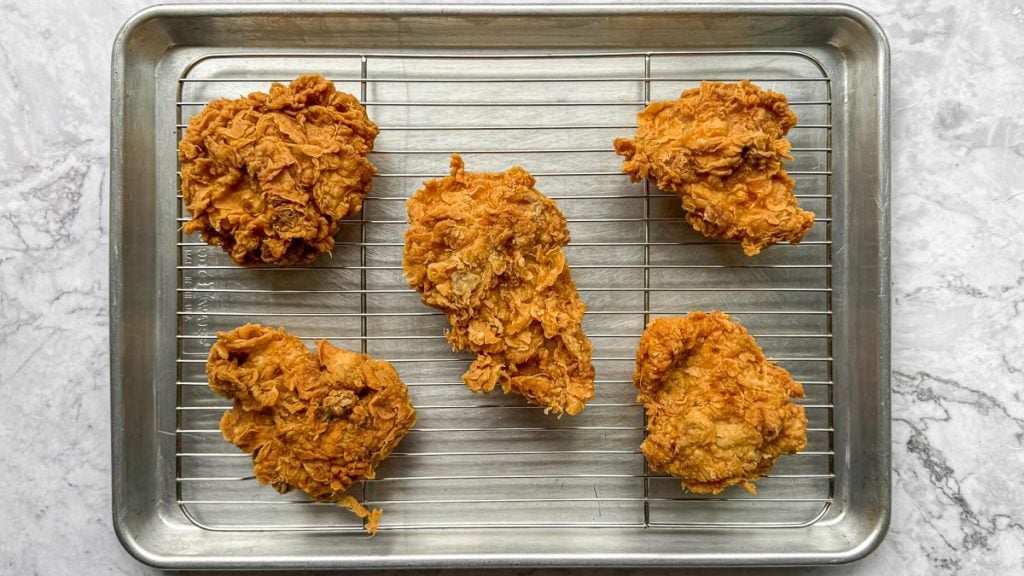
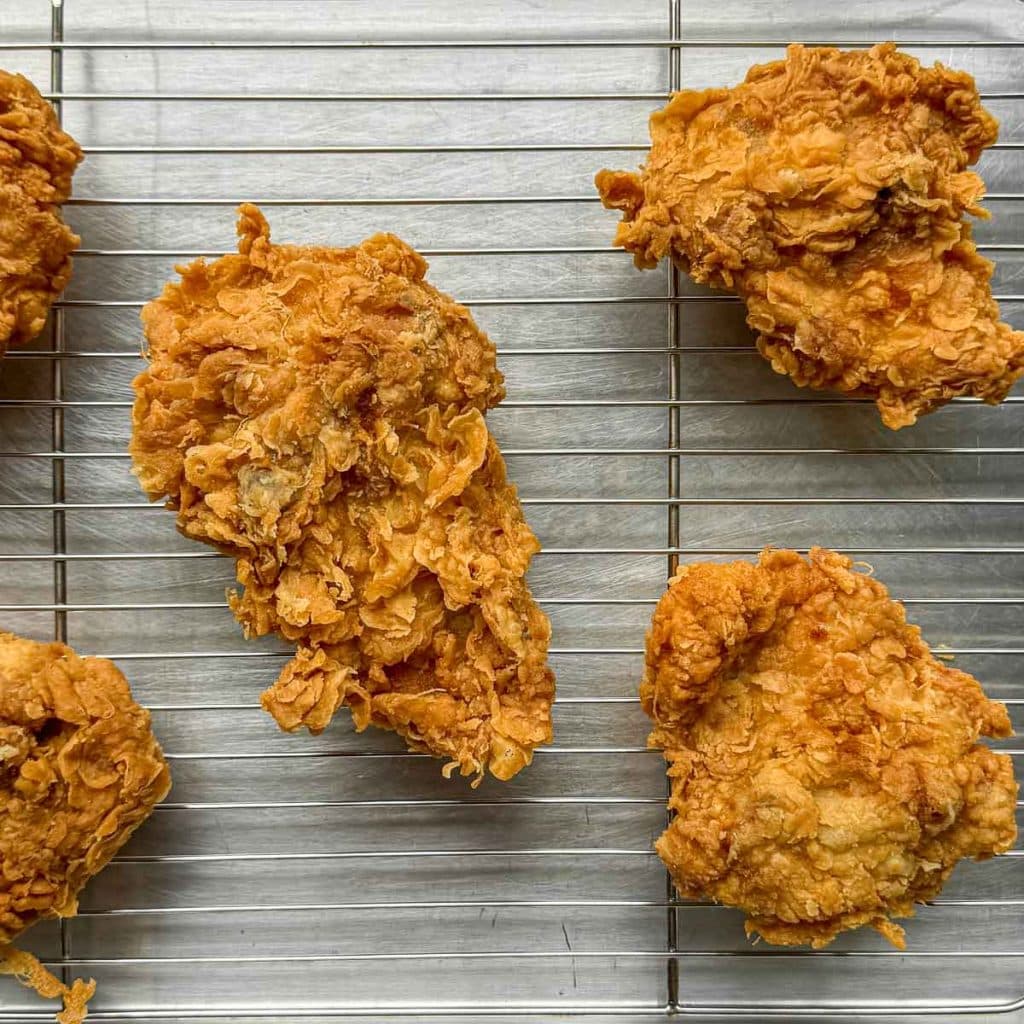
Once each batch is fried, transfer it to a wire rack instead of paper towels. Airflow is crucial for keeping that crust dry and crisp. Even hours later, this Lemongrass Fried Chicken holds its crunch – and it reheats beautifully.
To reheat, place it back on a wire rack in a 180°C oven for 10–12 minutes until the coating crackles again. Avoid microwaving; the moisture will soften the crust. Packed properly, it even travels well – cooled on a rack, not sealed, so steam can escape.
Level Up Your Lemongrass Fried Chicken
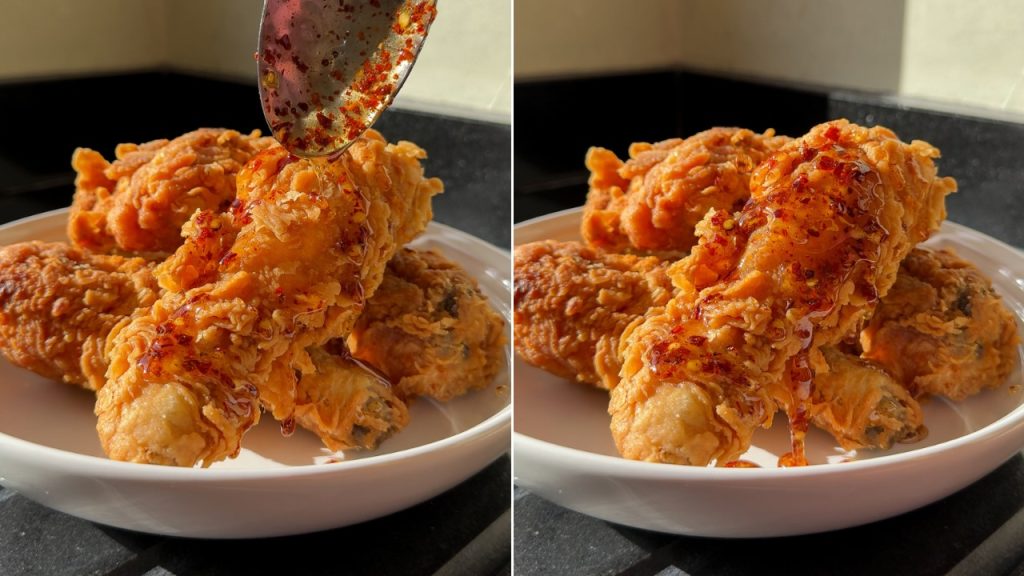
Good fried chicken rarely needs a dip, but it definitely welcomes a drizzle. Here, that drizzle is lemongrass hot honey – a three-ingredient infusion that balances heat, sweetness and aroma in perfect measure.
To make it, gently warm honey with crushed lemongrass stalks until fragrant, then stir in chilli flakes. Let it infuse for about ten minutes so the flavours meld. The result is a drizzle that’s floral, fiery and sweet all at once.
Pour it over the fried chicken while it’s still warm so it clings to the crust without soaking in. The honey cuts through the richness, the chilli adds brightness, and the lemongrass ties it all together. It’s simple, elegant, and exactly what makes this Lemongrass Fried Chicken stand out – familiar comfort, elevated.
FAQs
Can I use plain flour instead of 00 flour?
You can, but the crust won’t have the same lightness. 00 flour gives a refined crispness that stays crunchy even the next day.
How long should I brine the chicken?
Between 8 and 24 hours works best. Less time won’t flavour it deeply enough; longer can affect texture.
What kind of oil should I use?
Vegetable, sunflower and peanut oil are ideal. They all handle high heat without breaking down or adding flavour. Avoid oils like olive or coconut as they have too pronounced a flavour and a low smoke point.
Can I make Lemongrass Fried Chicken ahead of time?
Yes. Cool it completely on a wire rack, refrigerate uncovered, and reheat in a 180°C oven for 10–12 minutes until crisp again.
Can I air fry instead of deep fry?
Many food bloggers suggest that you can bake or air fry fried chicken for a healthier alternative. However, I wouldn’t recommend it. Fried chicken is a treat, and if you’re treating yourself, you might as well fully indulge! However, if you’re looking for a healthier chicken recipe that is also delicious, here are some of my favourites:
Lemongrass Fried Chicken

This lemongrass fried chicken is about to become your new favourite fried chicken recipe. It’s juicy, deeply aromatic and incredibly crispy, finished with a simple three-ingredient lemongrass hot honey that takes it to the next level. The crust is impossibly light yet shatteringly crisp – exactly what fried chicken should be.
- Prep Time: 40 minutes
- Total Time: 1 hour 15 minutes, plus brining time
- Yield: 4-6 1x
Ingredients
For the brine:
- 4 lemongrass stalks, tough outer layers removed and roughly chopped
- 8 fresh makrut lime leaves, torn
- 4 garlic cloves, smashed
- 4 tsp salt
- 1 litre water
- 1kg chicken thighs and/or drumsticks
For coating and frying:
- 450g 00 flour (or plain flour if needed, though it won’t be as light and crisp)
- 1 tsp salt
- vegetable oil, for deep frying
For the lemongrass hot honey (optional):
- 100g runny honey
- 2 lemongrass stalks, tough outer layers removed, halved and crushed
- 1 tsp chilli flakes (or more to taste)
Instructions
- Place the lemongrass, lime leaves, garlic, salt and water in a blender and blitz until the aromatics are finely chopped – the more broken down they are, the more flavour they’ll impart. Pour the brine over the chicken in a large bowl, cover with cling film and refrigerate overnight, or for up to 24 hours. Any longer and the chicken will over-brine (i.e. get too salty) and lose its texture.
- Remove the chicken from the fridge 30 minutes before frying to take the chill off.
- Fill a large, deep pan or Dutch oven halfway with vegetable oil and heat over medium-high heat to 160°C. Set a wire rack over a large baking tray – this is where the cooked chicken will rest, allowing air to circulate and keeping it crisp.
- In a large bowl, combine the flour and salt to make your dry mix. Set aside.
- Place a large sieve over another bowl and pour the brined chicken through it, catching the liquid underneath – this reserved brine will be used to dredge the chicken.
- Drizzle 2-3 tbsp of the reserved brine into the flour mixture and toss gently with your hands until small clumps start to form. These irregular bits of hydrated flour will fry up into those wonderfully crispy, craggy bits.
- Working with one piece of chicken at a time, coat it in the flour mixture using your “dry” hand. Shape your hand like a claw and press the flour firmly into the chicken so it adheres and forms a textured surface. Shake off any excess, then use your “wet” hand to dip the chicken into the brine, letting the excess drip off. Return the chicken to the flour mixture and repeat the claw motion to coat thoroughly. Take your time here – pressing the flour in creates those light, craggy edges that fry up beautifully. Once coated, set the chicken on a tray or plate while you repeat with the remaining pieces.
- When the oil reaches 160°C, carefully lower a few pieces of chicken into the oil, being careful not to overcrowd the pan. Fry for about 16 minutes, turning halfway through, or until golden brown and cooked through. Transfer to the wire rack to drain. Continue frying the remaining chicken in batches, keeping the cooked pieces warm in a 120°C oven.
- To make the lemongrass hot honey, place the honey and lemongrass in a small saucepan over medium heat. Bring to a gentle simmer, stir in the chilli flakes, then remove from the heat. Let it infuse for at least 10 minutes before drizzling over the fried chicken just before serving.
Notes
- 00 flour creates a lighter, crispier coating than plain flour due to its finer grind. If you use plain flour, it’ll still be crispy, just a little heavier.
- Brining time is key – under 8 hours won’t flavour the chicken deeply enough, and over 24 hours can make the texture too soft.
- Frying temperature matters. Keep the oil steady at 160°C; too low and the coating will absorb oil, too high and it’ll brown before the inside cooks.
- Reheating: To re-crisp leftovers, place the chicken on a wire rack set over a tray and heat in a 180°C oven for 10–12 minutes. Avoid microwaving, as it will soften the crust.


8 responses
This is absolutely amazing! The instructions are so detailed, you’d have to be an idiot to Not cook the best fried chicken ever!
Thank you so, so much John!
THIS IS THE BEST FRIED CHICKEN I’VE EVER MADE!!!!!
Thank you!!
I’ve tried quite a few fried chicken recipes and this one was hands down the best one! The lemongrass undercuts the honey brilliantly. Thanks Zena 🙂
Ahh I’m so happy to hear it! Thank you 🙂
Hi Zena
Thanks so much for sharing your recipe. Could you suggest a brine recipe without the lemongrass/lime leaves?
Hi! My pleasure 🙂 To be honest, as long as you keep the water to salt ratio the same, that’s all that matters! So you can do just that and it’ll be great, or add in some of your favourite aromatics (e.g. roughly chopped onions, fresh herbs, citrus zest, etc).