Few things are more inviting than the aroma of freshly baked Garlic Rolls wafting through the kitchen. Just imagine, the rich, savoury scent of garlic and warm bread emerging from the oven. These pillowy soft rolls, infused with buttery garlic goodness, make for the ultimate comfort food. Whether served alongside a hearty soup, enjoyed as part of a special dinner, or simply devoured on their own, these rolls are a guaranteed crowd-pleaser.
Table of Contents
- Ingredient Breakdown
- The Key to Ultra-Soft Garlic Rolls
- Shaping and Proofing
- Baking to Golden Perfection
- Crafting the Garlic Butter
- Serving Suggestions and Pairings
- Storage and Reheating Tips
- More Bread Based Recipes
Ingredient Breakdown
- Whole milk: Creates a soft, tender crumb and adds a touch of richness.
- White granulated sugar: Feeds the yeast and helps with browning.
- Fast action dried yeast: Ensures a quick and reliable rise.
- Unsalted butter: Adds flavour and moisture to both the dough and the garlic butter.
- Fine sea salt: Enhances the overall flavour.
- Strong white bread flour: Provides structure and chewiness.
- Garlic cloves: The star ingredient, bringing deep, aromatic flavour.
- Fresh flat-leaf parsley: Lends a fresh, herbaceous note to balance the richness.
The Key to Ultra-Soft Garlic Rolls
The secret to achieving incredibly soft Garlic Rolls lies in the combination of warm milk, yeast, and proper kneading. Milk enriches the dough, making it tender, while kneading develops the gluten, giving the rolls their signature structure. The dough undergoes two rises: the first to develop flavour and the second to create an airy, pillowy texture. Allowing enough time for these rises ensures the rolls remain light and fluffy, with just the right amount of chew.
Using a stand mixer makes the kneading process effortless, but if you prefer a hands-on approach, kneading by hand works just as well. The key is to knead until the dough becomes smooth, elastic, and no longer sticky. This stage ensures that the rolls bake up beautifully soft, with an irresistible golden crust.
Shaping and Proofing
Shaping these Garlic Rolls is straightforward, yet it plays a crucial role in their final texture. Dividing the dough into equal portions ensures even baking, while rolling them into smooth, taut balls creates a beautiful, uniform shape. Arranging them close together in a baking dish allows them to rise into each other, resulting in that irresistible pull-apart texture.
Proofing them a second time before baking is essential. This final rise allows the rolls to double in size, giving them their characteristic airiness. If rushed, the dough may bake up dense rather than soft. A warm, draft-free environment speeds up proofing, but patience is key to achieving the best results.
Baking to Golden Perfection
Baking these Garlic Rolls at the right temperature ensures they turn out perfectly golden, soft, and airy. The lower shelf of the oven provides even heat distribution, allowing them to bake consistently. A slow, steady bake prevents them from browning too quickly before fully cooking through.
Brushing them with the remaining garlic butter as soon as they come out of the oven not only enhances their shine but also intensifies their rich, buttery aroma. This final step locks in moisture and adds a luxurious finish, making them impossible to resist.
Crafting the Garlic Butter
Garlic butter is what transforms these rolls from ordinary to extraordinary. Making it from scratch is incredibly simple, yet it elevates the flavour immensely. Fresh garlic is mashed into a fine paste with sea salt, ensuring an even distribution of garlicky goodness. Softened butter blends effortlessly with the garlic, and a generous handful of fresh parsley adds a fresh, aromatic lift.
For an even deeper flavour, the garlic butter is used at three crucial stages: first to grease the baking dish, then to coat the rolls before baking, and finally to glaze them once they emerge golden and fragrant from the oven. This layering technique infuses the rolls with rich garlic flavour from the inside out, ensuring that every bite is packed with buttery, garlicky deliciousness.
Serving Suggestions and Pairings
These Garlic Rolls are delightful on their own, but they also pair beautifully with a variety of dishes. Serve them warm with a bowl of homemade soup for the ultimate cosy meal. Check out all my soup recipes here. They also make a fantastic accompaniment to pasta dishes, soaking up every last drop of sauce. You can find all my pasta recipes here.
For a show-stopping appetiser, split them open and stuff them with cheese before rebaking until gooey and melted. Or for a simple yet indulgent treat, serve them with an extra drizzle of melted butter or a sprinkle of flaky sea salt. Whether enjoyed fresh from the oven or saved for later, these rolls never fail to impress.
Storage and Reheating Tips
If you manage to resist eating them all at once, storing these Garlic Rolls properly ensures they stay fresh for days. Keep them in an airtight container at room temperature for up to two days. To extend their shelf life, refrigerate them for up to five days, though they’re best enjoyed warm.
Reheating them is easy: a few minutes in a low oven restores their soft texture, while a quick zap in the microwave makes them just as irresistible. If you prefer extra crispy edges, pop them under the grill for a minute or two.
For longer storage, these rolls freeze beautifully. Wrap them tightly and store them in the freezer for up to a month. When ready to enjoy, reheat directly from frozen in a preheated oven until warmed through.
More Bread Based Recipes
If you enjoyed making these Garlic Rolls, why not try your hand at a few other bread based recipes I have:
- No-Knead Focaccia: This no-knead focaccia is so easy to make and you don’t need any fancy equipment. Perfectly crisp on the outside and soft and light on the inside.
- Flatbreads: Few things in the kitchen are as satisfying as pulling freshly baked bread out of the oven and these homemade Flatbreads, with their soft, pillowy texture and slightly chewy bite, are a perfect example.
- New York Style Bagels: Crunchy on the outside and perfectly chewy in the middle, these homemade bagels are easier to make than you might think. They just take a little bit of time, which makes them perfect for a weekend baking project.
See how I make all these recipes and more over on my Instagram!
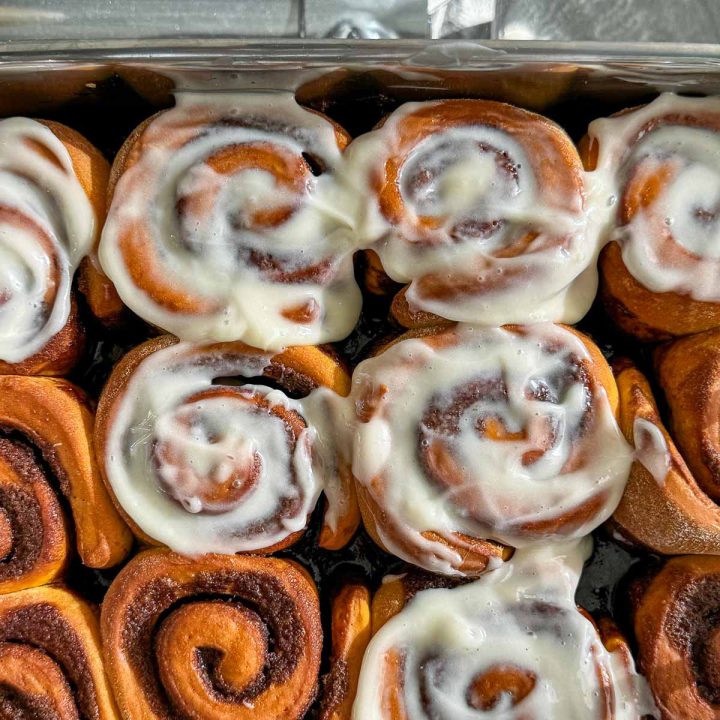
Garlic Rolls

Soft, pillowy goodness
Nothing beats the taste and smell of freshly baked bread. Except perhaps the taste and smell of freshly-baked garlic bread! These buttery, pull-apart garlic rolls are super soft and pillowy. They’re slathered with a delicious homemade garlic herb butter and baked until nice and golden.
If you are daunted by the idea of making homemade bread, this is the recipe for you. It’s much easier than you would think. All it really needs is time and a little TLC. I promise, it’s so worth it!
- Prep Time: 20 minutes
- Total Time: 3 hours 50 minutes
- Yield: 20 mini rolls 1x
- Category: Bread
Ingredients
For the rolls:
- 275 ml whole milk
- 10 g white granulated sugar
- 4 g fast action dried yeast (active dried yeast)
- 30 g unsalted butter, melted
- 10 g fine sea salt
- 500 g strong white bread flour
For the garlic butter:
- 3 garlic cloves
- ½ tsp fine sea salt, or more, to taste
- 120 g unsalted butter, softened
- 15 g fresh flat-leaf parsley, finely chopped
Instructions
- Heat the milk in a small saucepan over medium heat for 1 minute, or until warm to the touch. It should be lukewarm, not hot. If it gets too hot, let it cool down before moving onto the next step.
- Transfer the warm milk to a large bowl or stand mixer. Add the sugar and whisk to dissolve, then whisk in the yeast. Let sit for 5 to 10 minutes. The mixture should get foamy and bubbly. If it doesn’t, your yeast is dead and you’ll need to start again with fresher yeast.
- Whisk in the melted butter and salt, then add the flour and mix with a rubber spatula (or wooden spoon) until the dough comes together in a shaggy mass.
- If you have a stand mixer, use the dough hook and mix on low/medium-low speed for 5 to 7 minutes, or until soft, smooth and supple. If you don’t, turn the dough out onto a floured work surface. Knead by hand for 10 minutes, or until smooth, elastic and no longer sticky.
- Lightly grease a large bowl with extra-virgin olive oil. Shape the dough into a ball and transfer it to the oiled bowl. Roll the dough so it’s lightly covered in oil to prevent it from drying out. Cover the bowl with cling film. Let sit in a warm place for 1 ½ hours, or until doubled in size.
- Meanwhile, make the garlic butter. Place the garlic cloves and salt in a mortar and pound with a pestle until a paste forms. Add the softened butter and parsley and mix to combine. Taste and adjust the salt level, to your liking. Alternatively, you can grate or crush the garlic into the softened butter, then add the salt and parsley and mix to combine.
- Spread 1/3 of the garlic herb butter on the base and sides of a 35 cm x 25 cm (exterior dimensions) / 31.5 cm x 21.5 cm (interior dimensions) rectangular baking dish. Set the rest of the garlic butter aside.
- Once the dough has proved for 1 ½ hours, remove the cling film and punch it down to expel the air. Turn the dough out onto a floured work surface and knead for 1 minute to further deflate it.
- Roll the dough into a ball and divide it into 4, then divide each piece into 5, for a total of 20 portions. Working one at a time, and keeping the other pieces covered in cling film, roll each portion into a ball.
- Arrange the dough balls in a single layer in the baking tray, leaving a little space between each dough ball – 4 across and 5 long is perfect.
- Using your fingers, gently spread 1/3 of the garlic butter over the dough balls. Cover loosely with cling film and let sit in a warm place for a further 1 ½ hours, or until doubled in size.
- Preheat your oven to 190℃ / fan 170℃. Remove the cling film and bake the rolls on the bottom shelf of the oven for 30 minutes, or until nice and golden.
- Brush the baked rolls with the remaining 1/3 of the garlic butter to give them a beautiful shine. Leave to cool for 5 minutes then serve and enjoy!


Notes
The equipment section above contains affiliate links to products we use and love!